If you've used Crystal, then you're familiar with the preset patches that come with it and you have an
idea of the kinds of sounds you can make with it. If you'd like to expand the set of patches
available to you, check out the "Patches" link at the top of the page to download additional banks of
patches. At some point though, you may want to create your own sonic masterpieces and dive into patch
editing with Crystal. If that's what you want, you're in the right place.
How do you get started? The best place to begin is with the introductory tutorial in the
tutorials section below. That is probably the best place to start since it guides you
through a session and explains things to help you get started with editing. After you've mastered that,
you can use this page as reference manual - a place to explore the details or to get specific questions
answered about how certain features work. If you have questions or would like to share ideas
with other Crystal users, be sure to join us on facebook:

Tutorials
Here's an introductory tutorial for editing your own patches in Crystal.
This tutorial shows you how to get the most out of Crystal's Patch Bank Browser.
This tutorial covers copying voices.
This one is about the SawSquare oscillator type.
Here's a tutorial on how to get vowel sounds in Crystal.
Use soundfonts to expand the set of waveforms in Crystal. See this tutorial to learn how to make
own soundfonts.
Reference Manual
This reference manual contains the details on Crystal features and is the place to go to explore what
Crystal can do.
Description
Crystal is a semi-modular synth featuring both subtractive synthesis and frequency modulation (FM) synthesis.
It offers abundant modulation control with over 80 parameters which may be modulated, multi-stage envelopes
with graphical editors, extensive tempo sync of envelopes/lfo rates/delay times, built-in effects for
chorus/flanging/comb filtering/echoes, and a band splitter for effects processing by frequency band.
Getting Started
Crystal is a plugin, which means it runs within a host, such as Cubase, Orion, Logic, Fruity Loops, etc.
If you're like me, you've already tried some presets before you've started reading the documentation, so
you've probably already heard some of the sounds that Crystal can make. As you're listening to the presets,
note that some of the pads, ambient, and atmospheric presets take a while to evolve. By the way, when you
listen to the "Tempo Synced" presets, turn your song tempo up to a dance tempo of 140-150 in order to get
them to sound snappy. Also, note that the "Swell" programs are tempo sync'd, so hit the note on the "1", and
the sound will climax on the "1" of the next measure.
Program Editing
There are two ways to start editing a patch. The first way is to find an existing preset patch and
tweak it. The second way is to start from one of the patches named "Unused" at the end of the presets
menu. If you work by starting with an existing patch, use the utility menu (next to the Poly button) to make
a copy
of the patch to work on. To do this, select the patch you want to use as a starting point and choose
"copy" from the Utility menu. Then choose "Unused" from the preset menu and use the utility menu to paste the patch. That way
you can edit the patch without disturbing the original.
The utility menu also has a Revert which you can use as an undo: if, after editting a program, you want to
undo the edits, choose "Revert" to revert the program back to the state when you originally selected it.
Note that Crystal has very flexible signal routing. So much so that it is possible that you could find
yourself, while editing a program, overloading a filter with too much feedback and losing the audio output.
the utility menu can also come in handy in that situation: If you find yourself in that predicament, simply
choose "Reset" from the utility menu to get everything back to normal.
Ok, with that brief introduction out of the way, let's take a look at the Crystal editor window.
When opening the Crystal editor window, the first thing you will see is the modulation page.
Crystal is divided into 5 pages:
Modulation page:
The modulation page is where you specify how the controls are to be manipulated. You use a modulation
matrix to assign modulation sources to modulation targets. A modulation target is generally a control from
one of the voice pages or from the Mixer page. A modulation source is either a MIDI controller that you
use to manipulate a Crystal control or a virtual performer. A virtual performer is like a partner who
manipulates controls for you, leaving your hands free to control other things. Crystal offers two
kinds of virtual performers: Low Frequency Oscillators (LFO's) and modulation envelopes. An LFO moves
a control up and down in various ways. A modulation envelope follows a script to move a control in
a predefined sequence of steps whenever you play a note. Using the modulation matrix you assign a source to a
target, which means from that point on the control will be manipulated by the source.
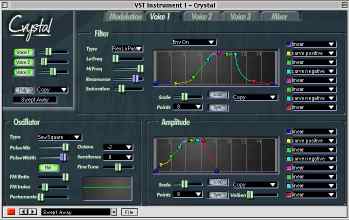
3 Voice pages
Crystal has 3 voices. A voice is a source of a tone that is generated in response to a midi note.
Each voice has 1, 2, or 3 oscillators which serve as the ultimate source of the sound. In addition, each voice
has an amplitude envelope to determine how the voice output level varies over time. Also, each voice has a
filter to add character to the sound.
Mixer page
The mixer page is where you combine the voices and add effects. The effects include a frequency band
splitter and 4 delays. The band splitter divides the input signal into 4 frequency bands, each of which may be
processed individually. For example, you could send each band to a different delay. The delays may
be used to produce a variety of effects, including echoes, comb filters, flangers, phasers, reverb, or chorus.
You navigate between the 5 pages by clicking on the tabs at the top of the window.

The "general" pane (the set of controls in the upper left corner) remain the same as you move from page to
page, so they will be available from each page. You can also click on the logo to get Crystal version
information.
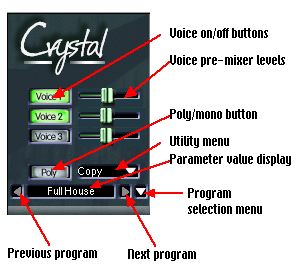
The general pane has the following controls:
Voice on/off
The voice on/off buttons turn each of the 3 voices on or off. Use these to enable a voice for a program, or to
solo/mute voices while editing.
Voice pre-mixer levels
These sliders control the output level of the voice, before it reaches the mixer.
Poly/mono button
The poly/mono button controls whether Crystal operates as a polyphonic synth (starting a new note every time a key is pressed) or monophonic (any previously sounding notes will be turned off when starting a new note). When polyphony is turned on, there are 2 levels of polyphony available. Press the "Poly" button
once to turn on normal polyphony mode. In this mode, a total of 12 voices are permitted. To enable
more voices, press the button again and the button label will show "Poly24". In this mode a total of
24 voices are permitted. Press the button again to turn off Polyphony.
Parameter value display
The parameter value display shows the value of a parameter while it is being modified. Use this to set a
parameter to a specific value. Note that you can opt-click (alt-click on windows) on controls to view the
current setting without modifying it. Also, when selecting a new program, the name of the program will be
displayed in the parameter display. Use the parameter value display to rename a program: click on the parameter
value display, then type in a new name. When editting an envelope, the values of the point are displayed as a
pair, with the time followed by the value.
Utility menu
The Utility menu lets you copy programs from one program slot to another. You can use this to create a new
program based on an existing program. Revert is an undo which will put the current program back to the
state it was in when you selected it, thus undoing any edits (including pasting a program) which you did
since then. You can also use this to do A/B comparisons between original and editted versions of programs:
select a program, make your edits, then copy the program. Switch back and forth between the original and
editted versions by choosing Revert or Paste. The utilty menu also has items for copying a pasting voices within
a patch, so you can copy voice 1 to voice 2 for example, by choosing "Copy Voice 1" followed by
"Paste to Voice 2". Also, the utility menu has a Reset item in case the sounds you're making get out of hand
or the filters overload leading to silence. Just choose Reset to put things back to normal.
The "Randomize Program" item of the Utility menu builds random programs as a way to create new sounds.
If you have some patience and try it over and over, you may occasionally get something interesting :-).
It differs from the randomize and genetics features included in sequencers in that it keeps the Crystal
envelopes from becoming garbled. Be careful when using Randomize. It is possible to get wild feedback loops.
If you get an unpleasant screech, choose Reset from the utility menu, which is just below Randomize.
The Legato portamento option causes portamento
effects to only occur when notes are played legato.
When the Legato mono option is enabled from the utility menu, playing a second
note in mono mode will not cause a new note to retrigger. Instead, the pitch of the first note
will jump to the pitch of the second note. This can be used for interesting trills and arpeggios.
Note that legato portamento and legato mono cannot be used simultaneously. Only one may be active at a time.
Program Selection menu
Crystal has built-in program selection controls, including "step up" and "step down". These are the right and left pointing
arrows on either side of the parameter value display. Clicking on these will select the next program up and
down in the current bank. Next to the "step up" button is a downward pointing arrow. Clicking on this will
present a menu that allows you to choose any program in the current bank.
Controls
Note to PC users: in the following, when it says "Cmd-click", read that as "Ctrl-click". When it says
"Opt-click", read that as "Alt-click".
Crystal uses 4 kinds of controls:
Drop down menus
Drop down menus (indicated by a downward pointing arrow) are used to select from a set of choices. For example:

Sliders
Sliders are used to specify a value from a range. Cmd-click on a slider to set it to its default value
(generally the middle of the range). While dragging a slider, its current value wil be shown in the parameter
display in the general pane. Opt-click on a slider to display its current value in the parameter display without
modifying the value. On windows, you can also right-click to view the parameter value. Shift-click on a slider to make high-precision adjustments. Use this if you're having
trouble getting a specific desired value.

Buttons
Buttons turn parameters on and off. When on, it will be illuminated. When off, it will be dark.

Envelope editors
These are used to edit envelopes. The envelope is a time graph, with time starting at the left and proceeding to the right. The output level of the envelope (which may be used to control a variety of things) is determined by how high or low each envelope point is. For example, for a sharp attack to a voice, edit the amplitude envelope so that it rapidly rises from the first point to the second.
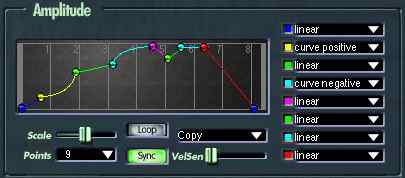
The envelope will proceed from left to right until the red point has been reached. It will remain at this point until the note is released. It will then proceed to the last point. Use the shape menus at the right of the editor to vary the shape of the output values of each segment as envelope proceeds from one point to the next. Curve positive will change slowly at first, then more rapidly. Curve negative will change quickly at first, then more slowly. The pulse shapes go up quickly to 1.0, 0.9, 0.75, or 0.5, then across 1/2 of the way to the next point,
then down to the level of the next point. the spike shapes go up quickly to 1.0, 0.9, 0.75, or 0.5, then down in a negative curve, reaching the level of the next point at the point in time 1/2 of the way to that next point.
The Flat shape holds the level at one value until the next point.
With Inverse Pulse, the line from the point starts towards the next point with the value of the first point. Then, half way to the next point, the value drops to zero before rising again when the next point is reached. This is very useful for arpeggios. See "Phased to Meet You" preset for an example.
Several of the "tempo synced" presets use pulses and spikes, so see those for examples.
The envelope shape menus have a clue appended to the "curve positive" and "curve negative" menu items to help you remember which direction each of those choices goes. Curve positive has a "-<" to remind you that curve positive starts out flat, then curves upward or downward (depending on whether the next point is above or below the first point). Curve negative has a ">-" to remind you that curve negative starts out curving upward or downward (depending on whether the next point is above or below the first point) then finishes flat.
If you turn on the loop button, the envelope will return to the beginning when sustaining instead of remaining at the red point. Specifically, it will go from the red point to the yellow using the shape and time interval of the initial (blue) envelope segment.
To edit the envelope, click and drag on any of the envelope points. Note that the order of the points is fixed, so you won't be able to drag a point to a time before the previous point, or after the next. Cmd-click and drag to move all the points in unison: their relative positions will be maintained. Opt-click to constrain the time positions to 1/4 of a grid unit. Ctrl-click to constrain the time positions to
1/3 of a grid unit (mac only). Shift-click to make precise movements.
Use the scale slider to change the time scale of the editor. With sync off, the grid units correspond to seconds. With sync on, the grid units correspond to 1/4 note beats.
Use the Points menu to increase or decrease the number of points in the menu. This is useful if you don't need the full complement of points, in which case fewer points would make the envelope simpler to edit.
Use the envelope editor copy/paste menu to copy and paste envelopes between editors or to load in a pre-defined envelope. Use copy/paste to ensure two envelopes are the same as a means to synchronize two envelopes. Or, copy/paste an envelope, then Cmd-click-drag or Cmd-opt-click-drag to make one envelope twice as fast (or any other ratio) as another envelope.
Note that envelopes are generated and triggered whenever you play a note. This means that if you are editting an envelope, you won't hear the results of your edit until the next note plays.
Those are the basics that you'll need to know about to find your way around the Crystal editor.
Now we'll step through each of the pages, examining them in detail.
Modulation Page
LFOs
The LFOs section in the lower left is where you define your LFOs to be used in the modulation matrix. Six LFOs
are available and you choose the one to edit with buttons labeled 1-6 at the top of the LFOs section.
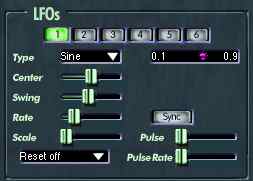
The LFO editor offers a number of parameters to affect the LFO. Most important is the waveform, which is
selected from the "Type" menu. Options include Sine, Random, Triangle, Square, Saw Up, Saw Down, and Heartbeat. Sine,
Triangle, and Square provide a wave in that shape. Random will described below. Saw Up and Saw Down provide
sawtooth-shaped waves which ramp up and down, respectively. Heartbeat uses mathematics from Chaos theory to
emulate the beating of the human heart. After selecting a type, select Center, Swing,
and Rate. The LFO oscillates about the center value. The amount that it varies from the center, or "swings"
back and forth around the center is determined by the Swing. So, for example a Center of 0.5 and a Swing of
0.5 would oscillate from 0 to 1. A Center of .4 and a Swing of .2 would oscillate from .2 to .6.
Note that a modulation source, such as an LFO, in Crystal is constrained to a range from 0 to 1. If you have your LFO defined to extend outside of this range, it will be clipped to conform to the 0 to 1 range. You can use this for some interesting effects. See the discussion below of Scale.
The rate determines how quickly the LFO completes each cycle. If the Sync button is on, it will be interpreted as cycles per beat. Otherwise, the rate is defined as cycles per second.
The Random type LFO is a sine wave, but at random times the rate will speed up or slow down and change direction.
Random Rate determines how frequently, on average, the rate will change. Random Mix determines how much the
rate will vary. At 0 it will remain at the value specified by the Rate parameter. At 1 the rate will go as
high twice the value of the Rate parameter.
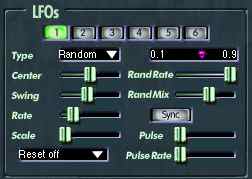
The Square LFO type also has RandRate and RandMix controls. This can be used to achieve what is
sometimes called sample and hold. This is an LFO which jumps to a random level, stays there for a random
amount of time, then jumps to another level. The SaturnScape preset uses this to vary the FM index of
voice 1 in interesting ways. To get this type of LFO, choose "Square" for the LFO type and turn up the
RandRate and RandMix controls. RandRate controls the randomness of the times between jumps. RandMix controls
the randomness of the levels.
The Heartbeat type of LFO has a Width parameter and a Damp parameter. Adjust the Width parameter to make the pulse wider, adjust the Damp parameter to make it bounce more or less.
Use the Reset menu to determine how the "randomess" is reset. With this off, the randomness continues
indefinitely, meaning that every time you play a note, you'll get something different. With the "Reset on note"
option, the randomness will be reset whenever you play a note meaning that you can get predictable random
variations. That's a good way to get something interesting, but it will sound the same whenever you play it back.
The String and Ice preset uses this to vary the Delay1 pan in an interesting, but reproducible way.
The Scale parameter increases the output of the LFO by the specified amount. At its lowest level, 1, the output
is unaffected. If increased to 2, it will double the output value of the LFO. The result would be to change
the first waveform pictured here to the second. However, since modulation source values are clipped to 0 - 1,
as shown here by the dashed lines, the resulting waveform will be the third one in the picture.
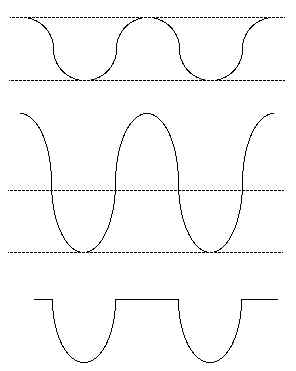
A Scale of 3 would mean the LFO is only below 1 1/3 of the time, and clipped at 1 2/3 of the time. The Mercury Steroids preset uses this to vary the Voice 1 Filter Frequency.
The Pulse parameters apply a square LFO to the LFO. This can be used to create a modulated tremelo that fades in and out with the primary oscillator of the LFO. The Pulse parameter is the mix ratio between the primary oscillator and the square pulse. At 0, there is no pulse, and at 1, they are mixed in equal quantities. The Pulse Rate parameter determines the rate of the pulse. This can be especially effective with a Random type LFO. The Who's In There preset uses this on LFO4 to apply a tremelo to voice 1 which varies randomly.
The swing value of an LFO can be a modulation target, meaning you can modulate one LFO with another. The Circus preset is an example of this.
The LFO display may be used to visualize the motion of the LFO. It shows the motion of the
selected LFO, including the values of the upper and lower ends of its range. If the LFO motion
extends beyond 0 or 1, that region will be displayed in gray, to let you know that the value will be clipped at 0 or 1 while in that gray region. Also, the indicator will be drawn as a
faint ghost while in the gray, clipped, region.
Modulation Envelopes
Crystal offers 6 modulation envelopes. A modulation envelope is a general purpose envelope which may be used
in the Modulation Matrix as a source to modulate any target. Choose the one you would like to edit
with the "1" through "6" buttons above the envelope editor.
Like all envelopes in Crystal, it is started (or restarted) whenever a note plays. It will be released when the last note playing is released.
Modulation Matrix
The Modulation Matrix is where you assign any of the modulation sources to modulation targets. There are
twelve "slots" available, which means you can have any twelve sources attached to any twelve targets. A
source is an LFO, modulation envelope, or MIDI controller. The twelve slots are divided into two pages
of six slots each. Select the page with the "1" and "2" buttons.
To attach a MIDI continuous controller to a Crystal modulation,
choose "MIDI CC Learn" from the menu under the "Source" heading in the Modulatoin Matrix. Then twiddle
your MIDI CC knob (or slider, or whatever). That control will automatically be tied that that modulation
routing and will control whatever you have selected for the corresponding modulation target. Alternatively,
if you know the controller number for your MIDI control, you can select that directly from the
Source menu.
The target is a Crystal parameter. If the parameter corresponds to a control in the editor window,
that control will turn blue to show it is under the control of a source in the Modulation Matrix.
The selections in the target menu are mostly self-explanatory since they correspond to
Crystal parameters which are explained in this user guide. The "Filter Envelope Depth" depth
target controls the amount of influence the filter envelope has on the filter frequency.
This is very useful when attached to key velocity or an LFO to modulate the amount of influence the
envelope has over the filter's frequency. See the ResoFlyMW preset for an example of using the key
velocity to control how much the filter envelope affects the sound. The "Split1,2,3" target
moves all 3 Splitter split points in unision, maintaining their relative proportions.
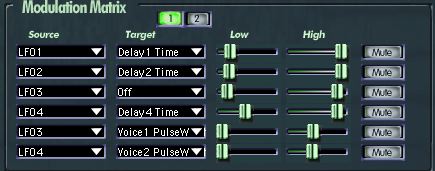
In each row, choose a source and a target. Use the Low and High parameters to determine how deeply the source
will affect the target. Setting the Low and High values close together will result in a subtle effect, far apart
will be extreme.
Each row of the modulation matrix has a mute button which may be used to suppress
that modulation routing. This is very handy when programming patches and you're trying
to isolate the effects of various modulations.
Generally, the meaning of 0 or 1 for the Low and High values is pretty obvious. There are some exceptions,
however. When modulating pitch, the value of 0.5 corresponds to the original frequency. Watch the
parameter display when adjusting the Low and High controls for pitch - it will show you the value
you've selected in semitones. So, to make a vibrato, set the modulator to vary equally on either side of 0.5. For example, use an LFO with a range from 0 - 1, and Low and High values a little below and a little above 0.5. The Fatness preset does this with LFO 1 modulating the pitch of voice 1.
The Delay times are also an exception. When you modulate a delay time, you are not directly modulating the value of the time parameter, but rather an amount which will be subtracted from the delay time. When the modulation source is at 1, an amount equal to the delay time will be subtracted from the delay time, resulting in zero. When the modulation source is at 0, zero will be subtracted, resulting in the value of the delay time parameter. The result is that you can modulate the delay time to produce chorus, phaser, and flanger effects.
Another parameter which is an exception is the Voice Oscillator pulse width parameter. When you modulate it, the modulation will range up to the position indicated by the pulse width slider, so you can use the pulse width slider to control how widely the modulation will range.
For example, the Springy preset modulates Delay 4 Time to produce a flanging effect. In general, to get chorus type effects, set the delay time to a value of less than .050 seconds, and modulate the delay time with an LFO. Use shorter delay times for flanging and phasing. Use high feedback to get a flanging sound. Then use the Mixer page to send the voice(s) to the delay. These types of effects sound best when mixed equal parts dry and delayed, so use the Mixer to set the voice and delay outputs to equal levels. Experiment with different pan settings and multiple delays with slightly different parameter values to get richer sounds.
Note that you can set the Low value to be higher than the High value. This "inverts" the modulation source, so that when it is high it produces a low value, and vice versa. The Moon March preset is an example of inverting a Modulation Envelope. It uses the modulation envelope to modulate the Voice 2 Filter frequency as normal, but uses the modulation envelope to inversely modulate Voice 1 Filter, with the result that the two move in opposite directions. You can also use this in combination with the Scale and Pulse parameters of the LFO to produce a modulator which is usually clipped at zero, but occasionally rises, instead of the opposite as was described earlier in the LFO section.
When a parameter is under the control of the modulation matrix, its slider indicator will change from green to
blue. This will be your clue that is it controlled by modulation and any changes you make to the slider won't
take effect until the modulation control is released from the modulation matrix.
Voice Pages
The voice pages are where you define the original tones that make sound in Crystal.
Oscillator
The oscillator section defines the waveform of the voice. Like the LFO, it offers waveform types, with a
somewhat different selection to choose from. Use the Type menu to choose the waveform. The menu is divided
into two sections. The upper section has synthesized waveforms and the lower section has sampled waveforms.
The synthesized waveforms give you more control over the sound, but the sampled waveforms, since they are
sampled from nature, are more complex.
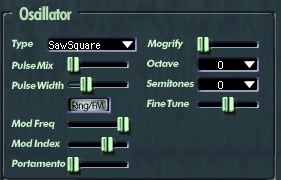
SawSquare is a waveform which can be either a Sawtooth or Square wave, or a blend of both. The Pulse Mix
parameter controls the blend, with a value of 0 corresponding to sawtooth, and 1 to Square. The Pulse Width
parameter controls the width of the square wave. Try modulating this with an lfo to get a chorus-like effect.
The Beast Belly preset uses this technique. The Pulse Width will be at a minimum when the control is near
a value of .5. It will be at a maximum when the control is near 0 or 1. Note that you get a different
timbre when it is at 0 than 1. It will have a different kind of "hollow" sound, so you can
take advantage of that to achieve different sounds.
Sine, triangle, and noise produce those waveforms.
Clang is a metallic sound with inharmonic character. See the "granular" patches for examples
of clang. Unlike the other waveforms which are frequency modulated with a sine wave, clang is modulated with a
clang, so you can get some interesting sounds with FM.
WarmSaw is a variation on SawSquare which produces a warmer, more analog sound. Use the PulseMix control
to control the amount of warmth.
The sampled waveforms have Granular and Wave Density parameters which may be used to produce a form of
granular synthesis. Using this technique, the sound is divided into "grains", which are then recombined into interesting new textures. Use the Granular parameter to adjust the "graininess". The Grain Density parameter controls the amount of overlap among the grains. And, of course, Granularity can be controlled from the Crystal modulation matrix
Octave, Semitones, and fine tune control the pitch of the oscillator.
The Ring/FM button turns on Ring or Frequency Modulation. Press it once to turn on Ring modulation. Press it again to turn on Frequency Modulation. Pressing it again turns off the modulation and the button returns to its unlit state.
Ring modulation applies a second, unchanging oscillation to the oscillator. Use this for percussive sounds.
In this Frequency Modulation mode, a second oscillator will run and its output will
modulate the frequency of the primary oscillator. The FM ratio parameter determines the frequency of the
modulator relative to the primary oscillator, so at a value of 0.5 it would have a frequency half of the primary. the FM Index parameter determines how much the modulator affects the primary. This useful for bells and percussive type tones. The Bells preset uses a voice with FM.
The Portamento parameter adds a "glide" to the pitch of each note so that it changes gradually from one
note to the next. Turn this control up to make the effect more pronounced.
The "oscilloscope" display shows the waveform currently being produced by the Voice module. It is the output of the oscillator after the filter and amplitude envelope have been applied, but before the saturation.
When the oscillator type is set to SawSquare or WarmSaw, you'll see a Mogrify control. This parameter controls a hard sync
Hard sync gives the sound a gritty edge by resetting the waveform at the period of the oscillator. As examples, check out the "Full House" preset in
the Vintage section and "Mushroom" in the "Motifs" section.
You can add your own waveforms to Crystal. If you've done so, you'll see a third section in the
Type menu which lists your waveforms. See the "Sample Import" section below to learn how to
import your own samples into Crystal.
Filter
The filter section controls the filter for each voice. Use the Type menu to select from a variety
of filter types. The filter includes a modulation envelope which will vary the
frequency of the filter between the values of the Lo Freq and Hi Freq parameters. The Hi Freq
parameter determines the frequency which corresponds to the upper limit of the envelope.
The Lo Freq parameter determines the frequency which corresponds to the lower limit of the
envelope. Watch the parameter display when moving points in the envelope to see the current
frequency for the point you are moving.
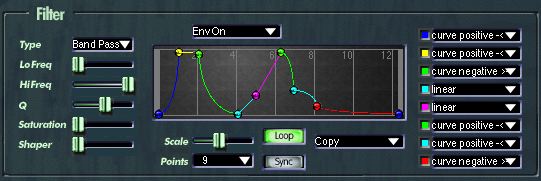
When the
envelope is turned off, the Hi and Lo Freq parameters are replaced with a single Freq parameter
which controls the frequency of the filter (cutoff for high low pass filters, center for notch
and band pass filters).
The filter includes a Resonance (or Q for the non-resonant filter types) control. The saturation control adds a tube-like distortion to the signal after
the filter has been applied. Note that the delays in the mixer section may be used as simple filters,
in case you need additional filters applied to the voice.
The filter section of each voice has a Shaper control which imposes a soft wave shaping function on the
voice before the filter is applied.
Note that you'll find two resonant low pass filters: ResLoPass and XResLoPass.
XResLoPass, provides a richer tone for those times when you want that squishy, liquid sound,
but uses slightly more cpu than ResLoPass.
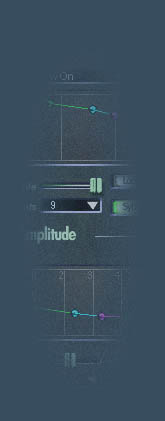
Amplitude
The amplitude envelope controls the output level of the voice before the pre-mixer fader of the general pane.
The "VelSens" parameter controls the sensitivity of the note volume to the note on velocity, in other
words, how hard the note is struck.
Mixer Page
The mixer page provides control over the blending of the voices and applies effects to them.
The Delays section controls the four delay effects in Crystal.
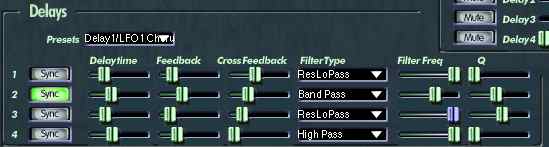
Each has a delay time parameter, which may be sync'd to tempo. When sync'd, the parameter display will show
a meter unit, for example 1/4 to indicate a quarter note. If you are having a hard time selecting a desired
meter unit, try holding down the shift key for high precision mode. Each delay has a feedback control and a
cross feedback control. The delays are arranged in pairs, so that the crossfeedback of 1 goes to 2, 2 to 1, 3
to 4, and 4 to 3.
Each delay also has a filter, with a choice of filter type, a filter frequency (cutoff or center), and Q to
specify the steepness of the filter. Note that you can use the delays as filters, not delays, by setting the
delay time
to zero, and the filter type as desired. That's a handy way to get a bank of filters through which you can
send the voices.
Delays can be used for a variety of effects, including echoes, comb filtering, chorus, phasing and flanging. Echoes and comb filters are static effects: the time parameter is not modulated. Simply set the delay time to a short value (less than .020 seconds) for a comb filter or a long value (greater than .050 seconds) for an echo effect. Use the delay send parameters to route one or more voices to the delay, then adjust the delay output level to suit your taste.
Chorus, phasing, and flanging are modulated effects: the delay time is modulated to give it a moving characteristic. You do this by using the Modulation Matrix on the Modulation page to attach a source (for example an LFO) to the delay time target. For a chorus, set the delay time to a value between .020 and .050 seconds, then go to the Modulation page and use the Modulation Matrix to assign an LFO to the delay time. For example, choose Delay 1 and set the time to .030 seconds, set LFO1 to a slow sine wave, then choose the first row of the Modulation Matrix on the Modulation page and select LFO 1 as the source and Delay 1 time as the target. Set the Low and High values in row 1 of the Modulation Matrix to 0 and 1.
Alternatively, you can simply choose "Delay1/LFO1 Chorus" off of the Delay presets menu and it will perform the above steps for you automatically.
Then, turn up the Delay 1 send parameters (near the top of the Mixer page) to send your voices to the Delay, and turn up the output level for Delay 1. For best results, mix the dry output level of the Voice and the level of delay in equal parts. Try adjusting pan values for the delay, or feedback (or any delay parameters) to get different results. Set up more than one delay for a chorus effect and send your voice(s) to all of them and mix and pan them in different proportions to get interesting results.
Note that the Delay1/LFO1 presets use row 1 of the Modulation Matrix, Delay2/LFO2 use row 2, Delay3/LFO3 use row 3 and Delay4/LFO4 use row 4. That way you can set up all 4 delays and still have 2 rows left in the Modulation Matrix for other purposes.
The delays be used as a Reverb. To use a delay as a reverb, set its filter type to "Reverb". When in this
mode the Feedback parameter will control the room size for the reverb, the Delay Time parameter controls
pre-delay, and the Filter Frequency parameter controls a low-pass filter for the reverb. The Presets menu
in the Delays section of the Mixer page has options to set each of the 4 delays to reverb. For example,
to use reverb choose "Delay 1 Reverb" from the Delay Presets menu, then send one or more voices to Delay 1
using the Delay Send controls at the top of the Mixer page. Note that the reverbs are in pairs, so if you'd
like a stereo reverb, set delays 1 and 2, or 3 and 4, to Reverb mode, pan them (1 or 3 to the left, 2 or 4
to the right), and send to both delays of the pair.
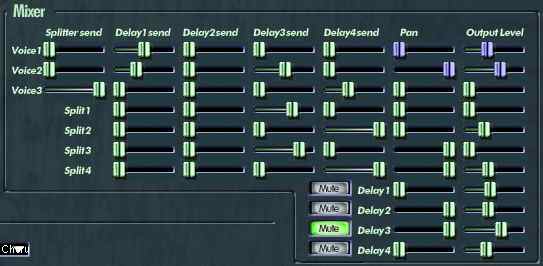
Mixer
The mixer is used to control the send levels of each voice to the band splitter, each of the 4 delays, and to
output. Each delay has a mute button, which can be useful when you're trying to discern the contribution each
delay makes to the sound. It is organized into a matrix with each row corresponding to an output source.
The columns contain the controls you can apply to each of these output sources.
The Splitter send controls how much of each voice is sent to the Splitter. Likewise, the delay sends
control how much of each voice or splitter band is sent to each delay. The pan and output columns
control the pan and gain settings for each source of output.
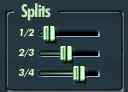
Band Splitter
The Band Splitter is a four-way crossover filter that divides the input signal into four bands.
The frequencies at the dividing points between the four bands are determined by the 1/2, 2/3, and 3/4 parameters.
Watch the parameter display as you move these controls to see what frequency you are selecting.
The Band Splitter is very useful for taking the output from one or more voices (use the mixer to send
the output from a voice to the splitter) and routing only selected frequency bands to a delay. For
example, you could set the delays to produce 4 different chorus effects, then send each of the
4 splitter bands to a different delay, with the result that each frequency band has a different
chorus effect applied to it.
The split points may be modulated individually from the modulation matrix, or you may modulate the Split 1,2,3 target which varies all three split points in unison, maintaining their relative values. The AstroStrings preset is an example of using the Band Splitter with the Split 1,2,3 modulation target.
Patch Bank Browser

The Patch Bank Browser, which is located in the "Browse" tab of the "Patches" section on the Modulation page, enables you to browse through saved banks of Crystal patches and import them with the click of a mouse.
If you don't have any Crystal patch banks yet, you can find some on
the patches page.
Just drag the bank (.fxb) files, one at a time, to the "Import Bank Drop" well in Crystal's Browse tab (under Patches on the Modulation page). Once imported, you can load a bank from the Banks menu, and choose patches from the loaded bank with the Patches menu.
The Patches menu gives you access to all the patches in all
the patch bank (.fxb) files in your CrystalPatchBanks folder. You choose
these patches by making a selection from the Banks menu (to choose
the patch bank), and then a selection from the Patches menu (to
choose the patch within that bank). When you
make a selection from the Patches menu, that patch is imported from the
bank file into the current preset (as selected by the Presets menu).
The left and right arrows below the Patches menu allow you to step through the patches forward and backwards. If you add new bank files after you start Crystal, choose "Banks" from the Banks menu to refresh the list of bank files in the menu. You can "undo" the import of a patch by choosing "Revert" from the Utility menu (next to the Poly button).
Crystal offers the ability to write patches to a .fxb file from within Crystal. This
export feature works on .fxb files which are stored in your CrystalPatchBanks folder.
Note also that these feature only works with .fxb files which were created with
at least version 2.3 of Crystal.
To use this feature, select a patch you would like to write to a .fxb file, choose a bank from
the patch browser on the Modulation page, and choose the patch in that .fxb file you
would like to overwrite from the "Write" menu.
Wave Sequencing
Crystal offers 8-stage wave sequencing, meaning you can vary the waveform to be used for an oscillator among 8 different pre-defined sampled waveforms. There is a "Wave Sequence" section in the preset patches included with Crystal which has 10 examples of patches which use Wave Sequencing.
Here are the instructions for creating Crystal patches which use wave sequencing:
- Select one of the unused presets at the end of the presets menu.
- Go to the voice 1 page and set its oscillator type to one of the pre-defined samples (the ones in the 2nd section of the oscillator type menu, starting with Sync and ending with Vinyl).
- Go to the modulation matrix on the modulation page and pick an unused row (where the source and target are set to "Off". Choose "ModEnvelope1" for the source and "Voice 1 Wave Sequence" for the target.
- Go to modulation envelope 1 and set all the shapes to "Flat" by choosing "All Flats" from the envelope presets menu to the right of the "Loop" button.
- Now, move the points in modulation envelope 1 to select waveforms at various points in time. The parameter display will show you the name of the waveform as you move a point. I'd recommend snapping the points to a time value by holding down the option key (alt key on windows) as you drag a point around.
- Use the Wave Density control (in the Oscillator section of each voice page) to control the crossfade time for each wave. The maximum cross fade time is 5 seconds, so watch the parameter display as you adjust the Wave Density. You don't want the crossfade times to be longer than the sequence step times in the modulation matrix (otherwise, the sequence will seem to skip steps).
- Have fun. Things to try: copy the modulation envelope to the voice amplitude or filter envelope and then make the filter or amplitude change in sync with the wave sequence. Modulate 2 voices with the same wave sequence, but detune one voice and pan the voices left and right.
Sample import
What it is:
Soundfont is a file format created by EMU. Files of this type contain sampled
instruments which may be played by soft synths like Crystal.
Crystal can import uncompressed SoundFont samples, thus enabling you to expand
the list of available waveforms in Crystal. To import soundfonts, create a folder called
CrystalSoundFonts and put some .sf2 files into that folder. Put that CrystalSoundFonts folder in your Crystal folder. You can find your Crystal folder by choosing "Show Crystal Folder" from Crystal's Utility menu.
Also, Crystal provides hierarchical organization of your soundfonts. If you put the
soundfont files in a tree of folders, that tree will be reflected in Crystal's oscillator
type menu as submenus. Use this feature to organize your soundfonts into categories
which are easy to navigate from within Crystal.
There are a number good places to download soundfont files on the web. Try
http://www.hammersounds.net or http://www.thesoundsite.net. On windows, VSampler
(http://www.vsampler.com) may be used to create your own soundfonts. There are also
a number of good commercial sites that sell excellent sound fonts, including
http://www.soundfonts.com and http://www.sonicimplants.com
Crystal imports key and velocity mapping from SoundFonts, so you'll get full multisampled
sounds. The purpose of this feature is to expand the variety of waveforms in Crystal,
but the intention is not to make Crystal a full-fledged sample player. So,
while samples, key mappings, and velocity mappings are imported into Crystal, other
settings, such as envelope settings and effects are not. So, after you import, use
Crystal's envelopes and effects to mold the sound to your heart's desire.
Also note that the quality of soundfonts can vary, so don't be surprised if you get some
soundfonts that loop when they shouldn't or if you sometimes hit notes that are out of tune.
A bit of advice regarding the use of soundfonts in Crystal:
Crystal is not intended to be a general soundfont player.
Instead, it uses soundfonts as a source of waveforms.
The advantage to soundfonts is that the waveforms can
be multisampled, allowing you to get higher quality sounds
than if you use .wav or .aiff files.
With that in mind, I would not recommend just blithely
adding a lot of soundfont files into your CrystalSoundFonts
folder. Instead, be selective and only add ones with
interesting waveforms.
For one thing, simply dumping a bunch of soundfont
files into your CrystalSoundFonts folder will clutter
your Oscillator Type menu with a lot of uninteresting
waveforms. For example, you'll probably end up with
hundreds of sine waves :-).
For another thing, having a large number of soundfonts
will slow down the launching of Crystal.
So, start with the Crystal Sample ROM soundfonts in
your CrystalSoundFonts folder. After that, be selective
when adding soundfonts and only put soundfonts which have
interesting waveforms into your CrystalSoundFonts folder.
Program morph
Program morph is a modulation target, which when modulated, morphs between two programs: the one immediately before the current one in the preset list, and the one immediately after. See the "Morph" preset as an example. Select "Morph" and move your mod wheel up and down while holding a note. The program will morph between the "Morph source 1" and "Morph source 2" programs. Parameters which can vary continously (basically all the parameters
in the modulation matrix target menu) will vary while you hold down a note. Other parameters, for example envelope settings or oscillator type, will vary when you play the next note.
Program Morph is a modulation target like any other, so you can modulate it with a variety of things, including LFO's. If you use an LFO though, be careful that the LFO in use has similar settings in the two source patches. This is because the LFO parameters will morph just like all the other parameters and you probably don't want the LFO that is controlling the morph to be morphed radically during the morph.
You do have to pay some attention to the differences between the 2 source patches to get glitch-free morphing. Avoid differences which don't have "in-between" values. For example, delay filter types are chosen from a menu, so you may get a click when morphing between 2 patches which have different delay filter types, as the morph jumps from one menu selection to the next.
Patch breeding
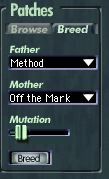
Patch breeding enables you to create new patches which are combinations of existing patches. To use patch
breeding, select the "Breeder" tab in the "Patches" section of the Modulation page. Select a
father patch and a mother patch. Optionally select an amount of mutation, which will introduce a degree
of randomness which is not directly derived from either the father or mother. Then press the "Breed"
button to create a new patch. (Caution: you can sometimes get unpleasant sounds, so be ready to
press Breed again or choose "Reset" from the utility menu if that happens).
20 Megabyte sample ROM
You may download and install 20 Mb of multisampled instruments for Crystal, thus making Crystal
a full-featured rompler.
To download and install the sample ROM, first find your Crystal folder by choosing "Show Crystal Folder" from Crystal's Utility menu. Create a folder named CrystalSoundFonts in your Crystal folder. Download the 20MB SF2 ROM by clicking here.. After you download and uncompress the sample ROM (be sure to check "use folder names" in winzip when
uncompressing), you'll have a folder named CrystalSoundFonts,
which contains three folders, named Ethnic, Orchestral, and Synth, each of which contains
one soundfont (.sf2) file. Copy those folders to the CrystalSoundFonts folder. The next time you launch Crystal, these soundfonts will show up on the Oscillator Type menu for each voice.
Here is a bank of 50 example patches which demonstrates
usage of the sample rom soundfonts.
Performance Tips
Tips for reducing cpu usage:
Turn off unused delays by muting them.
Turn off unused delay filters by setting their type to "Off"
Turn off unused filter envelopes
Turn off unused voices by turning off the voice on/off button in the general controls
Turn off unused voice filters by setting their type to "Off".
Turn off poly mode if not needed
If poly mode is on, keep release times in the amplitude envelopes no longer than necessary
Turn off unused modulation matrix entries by setting the source and targets to "Off".