|

|
 |
How to Make a Soundfont
In this tutorial, we'll make a soundfont, which you can use to extend the set of waveforms available for use in Crystal.
Before starting this tutorial, be sure to review the "Sample import" and "Oscillator" sections of the
Crystal user guide. The former will explain how to add soundfonts to
Crystal and the latter will explain how to use them in a patch.
Introduction
Before starting the "how to", a few words about the "why". Soundfont is a file format introduced by EMU systems.
It is a sample format which provides support for multisamples.
Multisamples means you use multiple
samples to provide the sound for an instrument. Why multiple? Because a single sample, such as you
find in a WAV or AIFF is generally insufficient to provide a high-quality sound across the
entire keyboard. With a single sample, a sound which sounds good on one part of the keyboard
may sound horrible on another part. Further, using a single sample leads the rise of aliasing,
a nasty sound which occurs when you play a single sample too far from its original range.
In contrast to single samples, multisamples provide multiple samples across the keyboard,
helping to avoid the problems associated with single samples. Soundfonts provide the ability
to map multiple samples across the keyboard, or even across velocity levels so that you
get a different sample depending on how hard you strike the key.
Soundfonts are a very flexible format and can include many things, including descriptions
of multiple instruments which may be layered together, envelopes, effects, and much else.
Crystal only uses soundfonts as a source of waveforms, so this additional information is
ignored by Crystal. If you have a soundfont with these extra bits and you'd like to
hear the full soundfont, not just the waveform, try a sampler or dedicated soundfont
player like Jeskola.
Start
Soundfonts are readily available on the internet (see the user guide for places to look),
but what if you have a sound that you would like to use which is not in soundfont format?
For example, you might have an instrument you'd like to record and then use that sound in
Crystal. Or, you might have a audio sample CD you've purchased. Magazines like FutureMusic or
Computer Music come with a cover CD which often includes instrument (electronic
or acoustic) samples which might be useful as waveforms in Crystal. The following procedure
describes how to take any of these sources and convert it into a soundfont usable by Crystal.
Creating a soundfont is, at most, a 4-step process. Depending on what you are starting with
as your source material you may have to do all four steps, or you might be able to skip right
to step 4. Here are the four steps:
- Record performance
- Save audio to WAV or AIFF files
- Prepare WAV or AIFF files for inclusion in soundfont
- Assemble WAV or AIFF files into a soundfont
If you're beginning with a WAV or AIFF file which is already looped, you can proceed right
to step 4. If you're beginning with WAV or AIFF file which is not looped, start with
step 3. If you're beginning with an audio CD, start with step 2. And, if you're beginning
with a sound which you will record, start with step 1.
Procedure for creating a soundfont
- Record performance
If you're recording a performance of an instrument as the source of your audio, use
your digital audio recorder to record a series of 3 or more notes, spaced evenly
across a range of 2 or more octaves. If you are recording a synthesizer, or something
you can trigger via midi, use your sequencer to play the notes so you can ensure
that the note on velocities are consistent. Make sure you get a nice, loud signal
recorded to ensure the best fidelity.
- Save audio to WAV or AIFF files
If you recorded a performance in step 1, now use your digital audio recorder to
save the audio to a WAV or AIFF file. If the source of your audio is an audio CD,
use a ripper like iTunes or Musicmatch to extract the audio to a WAV or AIFF file.
Even better, if your audio editor (which you will use in the next step) permits
you to import from an audio CD, use that instead. Note that audio sample CD's will
generally provide a set of at least
3 notes with different pitches, which enables you to use them for a multisample, so
if you starting from an audio CD, your WAV or AIFF file should consist of several notes
with different pitches.
- Prepare WAV or AIFF files for inclusion in soundfont
Ok, now we have the audio of several notes at different pitches, saved
into a WAV or AIFF file. The next step is to prepare it for use in a soundfont.
This means we need to:
- Make the audio mono, if it isn't already
- Slice it into a separate WAV or AIFF file for each note
- Crop it, to remove any silence from the beginning or end of each note
- Loop it, to provide the ability to sustain the note indefinitely
These steps are performed with an audio editor. I'll provide examples for both
mac and windows.
Mac version
On the mac, there are a number of choices for your audio editor. A couple of the
more popular are BIAS Peak and DSPQuattro. Infinity from Antares is also a good
choice. I'll list the steps to be performed using Peak.
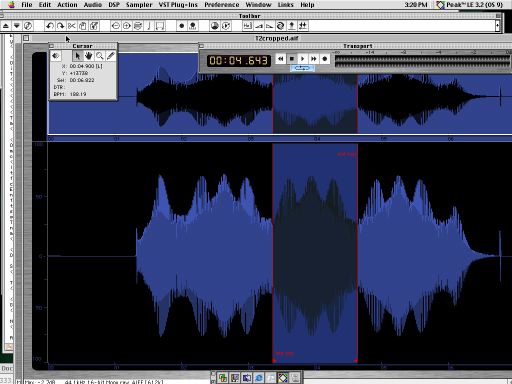
If you have a stereo file, convert it to mono by doing a File->Export Dual Mono,
then open the Right version of the file you exported. Next, make a mono file
for each note by selecting the audio for each note, excluding the silence before and
after the note, then
Edit->Crop, then File->Save A Copy As, then undo the crop. Repeat that for each
note and you should have a mono AIFF file for each note. Then open each note's AIFF file and, making sure you have "Preference->AutoSnapToZero"
selected, choose a region for the loop. Find a beginning point which has a similar
waveform appearance as the ending point, then choose Action->Loop This Selection.
Try out your loop by playing the audio with looping turned on. A good loop has
no audible artifacts when the loop jumps from the end to the beginning. You
may have to try various loop points to get a satisfactory result.
Windows version
On windows, there are many editors to choose from. I can recommend ZeroX Seamless Looper. Here's
the procedure using Seamless Looper.
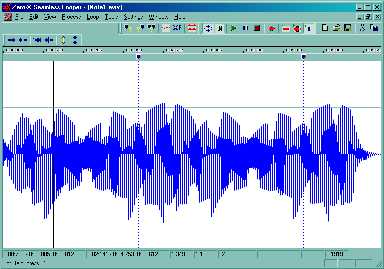
Open your WAV file which contains all the notes. Convert it to mono, if necessary by using
Process->Stereo to Mono. Next, select each note in turn and use File->Save Selection As
to save each note to its own WAV file. Next, open each note file and crop it using
Process->Crop->Start And End. Choose Settings->Sample and click on "Use detected" to assign
base note for this sample. Finally, loop each note using Loop->AutoSearch with the
Whole Sample option. Play the WAV with looping turned on to ensure that the loop
is indeed seamless :-).
- Assemble WAV or AIFF files into a soundfont
The final step is to take the WAV or AIFF files and put them together into a
soundfont.
Mac version
On the Mac, I recommend using Polyphontics to create soundfonts.
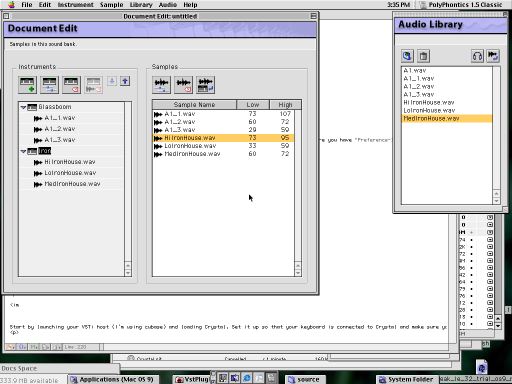
You'll see two windows when you start up Polyphontics. Our first step is to import
the AIFF files into the Audio Library. Click on the import button in the Audio Library
window and shift-select the note AIFF files to import them.
Next, create a new instrument in the Document Edit window with the "Create New
Instrument" button. Give it the name you'd like to see in Crystal's Oscillator
Type menu. Next, add the samples to this instrument with the "Add Audio" button
in the Audio Library window.
Next, double click on each sample in the Document Edit window. For each one,
enable looping and set the base note to the note that was originally played
when this note was performed. Then assign the keyboard zone which will play
this sample by clicking and dragging in the keyboard at the top of the window.
Click Ok, then move on to the next sample.
The keyboard zones should be non-overlapping, and the zone for each note
should be in the region of the original note that was played when it was
performed. The result is a mapping across the keyboard with no gaps and
each zone plays a note which was originally played in that zone.
Finally, choose File->Make Sound Bank to export the soundfont file (be sure
to save it with a .sf2 extension) into your CrystalSoundFonts folder. Note that you can save multiple instruments
into a single .sf2 file.
Windows version
On windows, I recommend using SoundFaction Alive.
To create an instrument, choose File->New Soundfont. Select the soundfont which
appears in the left pane and right click->Import Samples. Choose only the
first note's WAV file. This will create the instrument and load it with the
first sample. Expand the tree view to show the instrument, and right click->rename
to give it the name you would like to see in Crystal's Oscillator Type menu.
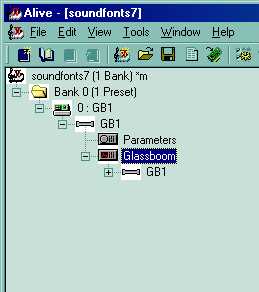
This picture shows the instrument renamed to "Glassboom":
Now, right click on the instrument you renamed, choose Import Samples, and
import the rest of the samples.
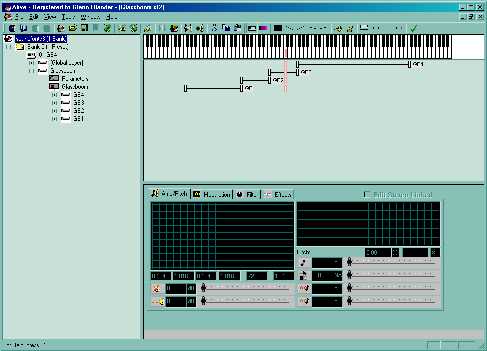
Select the instrument and you'll see a zone in the pane in the upper right for
each sample. Adjust the zones for each sample by selecting a sample, then dragging
the zone markers. The zones should be non-overlapping and each sample's zone should
be the vicinity of the base note that was originally played for that sample
(which should be the same as the base note which was assigned in SeamlessLooper in the
previous step), as in the following picture.
Double click on each sample and make sure the "Loop" option is checked. Finally, use File->Save As to save the soundfont into your CrystalSoundFonts
folder. Remember to use the .sf2 name suffix when saving. Also note that you
can put multiple instruments into a single .sf2 file.
Chainer
Note that windows users have another option for creating soundfonts:
Xlutop Chainer. If you're using a VST softsynth as the
source of the audio for your samples, use the standalone version of Chainer to host the VSTi, and use
Chainer's export facility to export a series of notes into a series of .WAV files.
Chainer has an "export soundfont" option, but there are problems with the soundfont
files it creates, so use the .WAV file option instead. Then follow the above
procedure, starting with step 3. If you're
using a softsynth as a source of your samples, however, you'll need to be
aware of the copyright restrictions regarding the use of those samples.
Congratulations! You've made a soundfont, which will enable you expand the
palette of waveforms to choose from when making your sonic masterpieces with
Crystal.
|
|
|
|
