Getting Started With Crystal Patch Editing
In this tutorial, we'll make a simple patch, a sound with some changing characteristics. The goal is to acquaint you with some of the techniques that you can use to create your own patches with Crystal. Don't worry, this will only serve as an easy introduction to working with Crystal, so there's nothing to fear.
Start
Start by launching your VSTi host (I'm using cubase) and loading Crystal. Set it up so that your keyboard is connected to Crystal and make sure you're hearing the Crystal presets. Listen to a few of the presets to make sure you've got everything in working order.
To begin with, we'll need a blank canvas on which we'll create our sound. To get a good starting point, choose one of the
presets named "unused", at the end of the presets menu, which has most of the parameters in a simple state suitable for
creating a new patch.
Voices
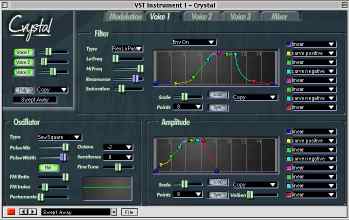
The controls in Crystal are organized into 5 pages and you select a page by clicking on the tabs across the top
of the window. Click on "Voice1" to go to the page with the controls for voice number 1.
Notice that the Voice 1 page is organized into 3 regions: Oscillator, Filter, and Amplitude. The Oscillator controls are
used to create the wave that you hear, the Amplitude controls determine how loud it is at different points in time, and
the Filter controls are used to add and subtract certain frequencies from the wave to give it interesting characteristics.
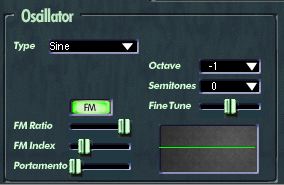
Go ahead and play a note. Watch the waveform display while you play a note. As you can see in the waveform display,
what you are hearing is a sawtooth wave, named because the waveform looks like the teeth on a saw. We want to start
with a mellower tone, so choose "Sine" from the "Type" menu in the "Oscillator" section of the page. Next,
choose "-1" from the "Octave" menu to lower the pitch by one octave.
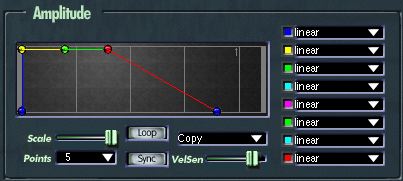
Now let's move on to the Amplitude controls which make the sound louder or softer over time.
We won't need all the points that are in the envelope for this example, so choose 5 from the
Points menu. Drag the blue point at the left to the bottom of the window and drag the yellow
point to the top until it has a piano-like sound when you play a note.
Next, make the loudness of the voice respond to the velocity of the key press by turning up the
VelSens control. This makes the loudness sensitive to how hard you press a key.
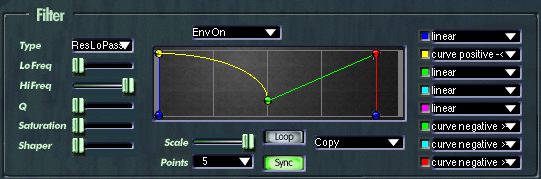
Next, let's use the filter for Voice 1. Choose "Env On" from the menu at the top of the Filter section.
Choose "5" from the Points menu to reduce the number of points in the envelope. Turn on the "Sync"
button for the filter envelope. This synchronizes the envelope with the tempo of the song. In this
mode, the numbers you see in the envelope (for example the "1") correspond to beats. That means
each vertical line you see in the envelope corresponds to a 1/16 note.
Drag the right-most blue point all the way to the right. Drag the red point to the top of the
window on the vertical line marked "1". This means when you play a note, the end point will
be reached one beat later. Since the red point is all the way at the top, the filter frequency
will be at its maximum value.
Drag the green point to the middle vertical line. This corresponds to a 1/8 note after you
play a note. Drag it downward and watch the parameter display under the Poly button. Keep
dragging it downward until the parameter display shows a value below 1kHz (for example,
0.98kHz). Now when you play a note, there is a dip in the filter frequency that is
synchronized to the tempo of your song.
Now, let's duplicate this first voice into Voice 2. Choose "Copy Voice 1" from the Utility menu
to the right of the Poly button. Next, choose "Paste to Voice 2" from the Utility menu. This
makes voice 2 a duplicate of voice 1.
Next, let's make voice 2 slightly different than voice 1. Go to the voice 2 page by clicking on
the Voice 2 tab at the top of the window. Change the waveform for voice 2 by choosing "Smooth"
from the Type menu in the Oscillator section. Notice how you can now hear two distinct voices
when you play a note?
Modulation
We've got two voices playing. Now let's add some movement to the sound through the use of
modulation. Go to the modulation page by clicking on the Modulation tab at the top of the
window. The Modulation page has a Modulation Matrix section which has six rows with
four controls in each row. Choose "LFO1" from the "Source" menu in the first row and "Voice1 Pan"
from the "Target" menu in that same row.
If it isn't already highlighted, click on the "1" button in the LFOs section to view LFO
number 1 (there are a total of 6 LFOs to choose from). When you play a note, notice how
Voice 1 pans from left to right in a motion that corresponds to the purple ball in the
LFOs section. Turn down the Rate control to slow the LFO and notice how the left/right pan
of Voice 1 slows down.
Turn on the "Sync" control for LFO1 to synchronize the LFO with the song tempo. Now adjust
the rate control until the parameter display shows "0.50 cpb". In other words the pan
will go from left to right once per 1/4 note (half a cycle per beat).

Next, let's add some interactive modulation by controlling the FM Index parameter of voice 2
with a MIDI controller. In the second row of the Modulation Matrix, choose MIDI CC Learn from
the Source menu. Now twirl any knob on your MIDI controller. For example, move your mod wheel.
Crystal will note which MIDI controller you moved and will use that in row 2 of the
Modulation Matrix. Now choose Voice 2 FM Index for the target in row 2. Try it out by turning
up your MIDI controller to add some growl to Voice 2.
Effects
Finally, let's add some echoes to the sound. Go to the Mixer page. There are a lot of controls
there, but don't worry - they are quite simple because they are laid out in a grid of
rows and columns. Add some echo to voice 1 by locating the slider in the "Delay 1 Send" column
of the "Voice 1" row and turn it up about half way. Locate the slider in the "Delay 2 Send"
column of the "Voice 2" row and turn it up about half way.
Make the echoes last longer by turning up the Feedback controls in the "Delays" section
for Delays 1 and 2.
Congratulations! You've made your first patch with Crystal. Be sure to save your work, either by saving your song or saving to an instrument file.
In this tutorial we've only lightly touched on the basics of Crystal: voice editing, mixing, and modulation. We've barely skimmed the surface of envelope editting and modulation, and skipped
other parts entirely. But don't worry, more tutorials are on the way.